Installation and Settings[ Step2 ]
Setting the network mode to Public through CB Setup
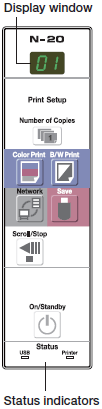
Check that the copyboard's power is turned on (that "01" is displayed on the display window).
- •Once the CB Setup mode is set, the mode returns to the normal mode if no button is pressed for 10 seconds.
1.Switch to the CB Setup mode.
- •While pressing the ON/Standby button, press the Number of Copies button, then release the ON/Standby button. The display window switches to "F1" (indicating the CB Setup mode).
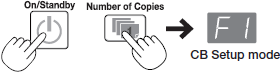
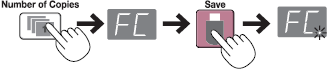
2.Switch the display to "FC" (network enabled mode).
- •Press the Number of Copies button several times to select "FC", then press the Save button to enter.
- •When entered, a dot lights up as confirmation.
- If "FC" is not indicated in the Display Window, it is required to update firmware of your Copyboard from the below link;Update the Copyborad
Select "Public".
- •Press the Color Print or B/W Print button several times so that the USB status indicator is off and the Printer indicator is lit green, then press the Save button to enter.
- •When the Save button is pressed, the copyboard system automatically reboots and the LEDs on the display window rotate. The display turns off once the setting is completed.
- •When you switch to the public mode, the copyboard's network settings are set as shown below. Change them as necessary.
IP address = 192.168.111.190
Subnet mask = 255.255.255.0
- •To switch back to "Group", set so that USB status indicator is lit green and the Printer indicator is off. This completes the settings.