

Home>Product>Whiteboard>Old product>Smartphone Ready Whiteboard >Features of the MTG Sync APP


iOS 4.3 or later
Android 2.3 or later
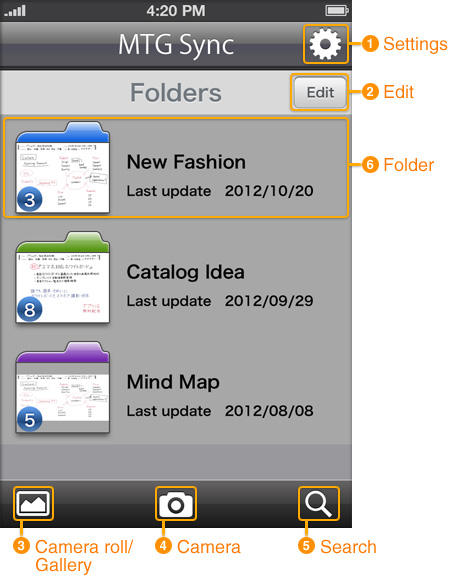
| ①Settings | Displays the "Settings" menu and setup items such as: ・" Image stabilizer function" on/off. ・Account setup for Evernote and Dropbox. ・Browse the "Help" menu. |
|---|---|
| ②Edit | Allows you to edit "Name" and "Color" of a folder or delete a folder. |
| ③Camera roll / Gallery | By importing images from "Camera Roll / Gallery", you can correct images of the MTG Sync Board that were taken by other means than by using the MTG Sync App (For example, images taken by the standard digital camera). Some images may not be corrected properly. Factors such as poorer camera capability may prevent image correction. When you receive via email an image already processed by the MTG Sync App on another person's smartphone, you can import it into the App on your smartphone using "Camera Roll / Gallery". |
| ④Camera | Enters to the "Snapshot" mode. |
| ⑤Search | Search for a file by the name of the folder, rating, shot date, etc. You can search for a file by "Title" and "Date" if you have previously input that information via the keyboard after saving the file. |
| ⑥ Folder | Files are saved in a folder. For the first use, you are required to select "New Folder" in order to create a folder in which to save files. "Number of saved files" is indicated in each folder icon. Tapping the folder icon displays the list of the file saved in it. |
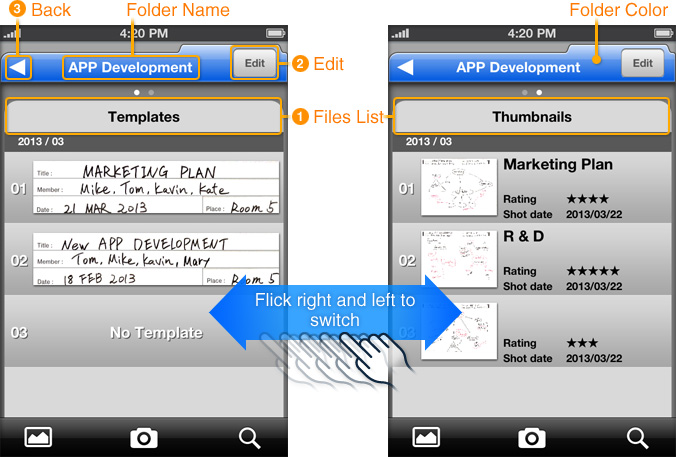
| ①Files list | The files in a folder are listed in the "Templates" and "Thumbnails" view. Flick right and left to switch 2 views and tap a file to browse full details of the file. *For the Android App, tap a tab of the "Templates" or "Thumbnails" to switch the views. |
|---|---|
| ②Edit | You can select one or multiple files to share, delete or move to another folder. When choosing to move files, you can move them to an existing folder or create a new folder. |
| ③Back | Returns to the "Top" screen of the App. |

| ①Share | Tap the button to browse the "Share" menu. You can send the file via email, upload it to cloud services such as Evernote and Dropbox, or export it to the "Camera roll" of your smart device. Furthermore, you can print the file from an AirPrint compatible printer. *"AirPrint" is a feature of the iOS. |
|---|---|
| ②Back | Returns to the "Files List" screen. |
| ③Template display | Hand-written items in the template sheet are shown as a separate thumbnail image in the App The check "Rate" in the template is represented in the "Rating" field in the "File details" as star (★) marks. |
| ④Preview image | You can zoom in and off of the file by double tapping or using the "pinch" method. By flicking right or left, you can move to the previous and next files if multiple files are saved in one folder. *For the Android App, tap a preview image to move to other image. |
| ⑤File details | The "Title" and "Date" fields are not automatically entered when the file is saved. To enter this information, tap the blank space and manually type in the information using the keyboard of your smart device. The check "Rate" in the template sheet is shown here as star (★) marks in the "Rating" field. Tapping the "Rating" area allows you to change or newly enter star (★) marks if they were not checked on the template sheet. |
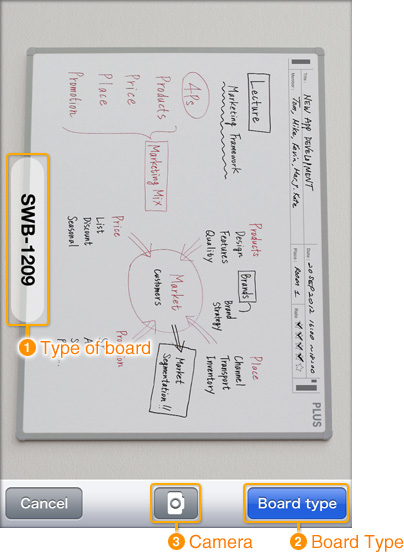
| ① Type of board | The App uses this information to properly detect the board's frame and correct image distortion. *For the first use, input the 4-digit number printed on the upper right side of the whiteboard to register the board type. |
|---|---|
| ② Board Type | Allows you to enter or change the board type. |
| ③ Camera | Takes a snapshot of the whiteboard and detects the contour of the board frame. |
Note: Tap the "Camera" button after confirming the whiteboard well within the display. Keystone correction may fail if PLUS logo is not recognized.
Recommending shooting distance is max. 3m (9ft) with iOS / max. 2m (6.5ft) with Android, angle is max. 45 degrees left/right, however this may vary with the shooting condition. For best results, shoot from the front of the board at the nearest distance, making sure the PLUS logo is properly recognized.
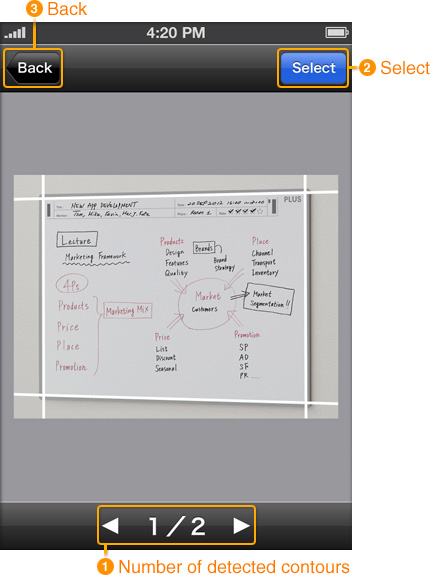
| ① Number of detected contours | The number of the detected contours is indicated. Tap the |
|---|---|
| ② Select | Tap to select the best contour for keystone correction and begin image processing. |
| ③ Back | Returns to the "Snapshot" screen. |
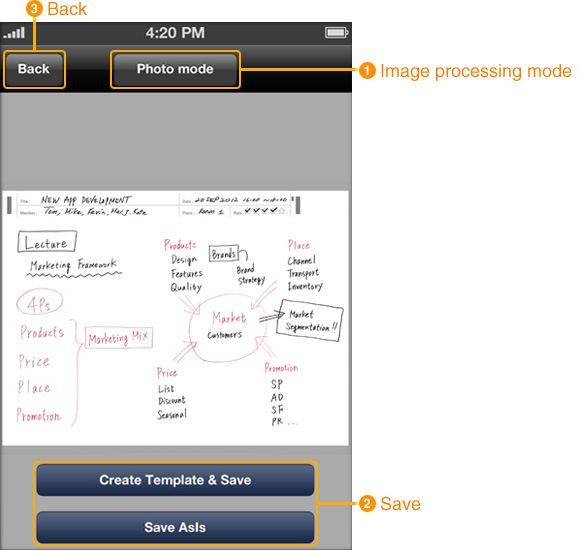
| ① Image processing mode | Use this button to toggle between "WB mode" and "Photo mode". Image processing occurs after tapping the button so you are able to preview your file. "WB mode" enhances the contrast of the image, making the notes written in marker very sharp and crisp. "Photo mode" enhances the color of the image, making both handwritten notes and pictures attached to the board appear more vivid. |
|---|---|
| ② Save | If the template sheet was used, tap "Create Template & Save". If not, tap "Save as is" and then choose either "New folder" or "Existing folder" to save the file. *For the first use, you will be required to create a new folder. |
| ③ Back | Returns to the "Detected contours" screen. |
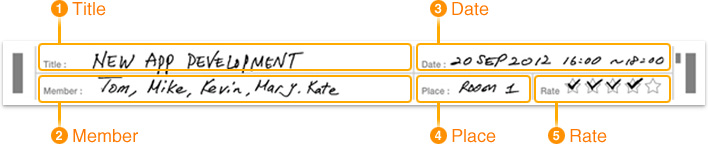
Attach the magnetic template sheet to the whiteboard. Fill in the meeting information in the appropriate fields (Date, Title, etc.). The App shows the template sheet as a separate image thumbnail for quick browsing.
| ① Title | Write in the title of the meeting. |
|---|---|
| ② Member | Write in the names of meeting attendees. |
| ③ Date | Write in the date of meeting. |
| ④ Place | Write in the place of the meeting. |
| ⑤ Rate | Check the ☆marks to indicate the importance of the meeting. |
【Note】
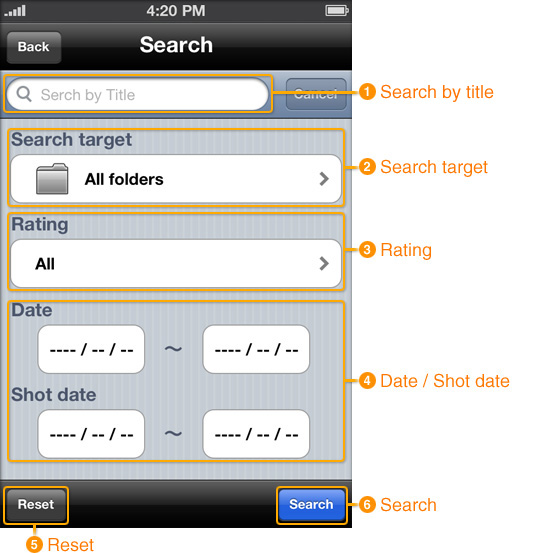
| ① Search by title | Input the "Title" of the file you want to search for. The "Title" of the file can be entered in the "File details" section. |
|---|---|
| ② Search Target | Select a folder from the "folders list" you want to search for. |
| ③ Rating | Select number of star (★) marks of the file you want to search for. |
| ④ Date/Shot Date | Select the date of the file you want to search for. *"Date" can be entered in the "File details" section. *"Shot date" is registered automatically with the App and can not be changed. |
| ⑤ Reset | Clears "Search target", "Rating", "Date" and "Shot date". |
| ⑥ Search | Starts a search. |
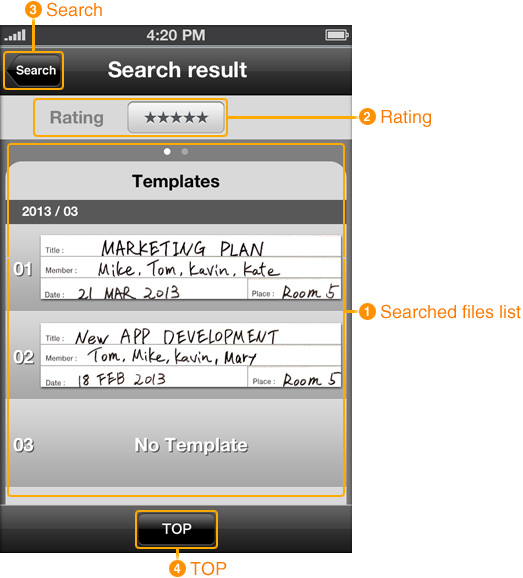
| ① Searched files list | Shows the searched files in the "Templates" or "Thumbnails" view. Flick right and left to switch between the two modes. *For the Android App, tap a tab of the "Templates" or "Thumbnails" to switch views. |
|---|---|
| ② Rating | The searched files can be sorted by "Rating". |
| ③ Search | Returns to the "Search" screen. |
| ④ TOP | Clears search results and returns to the "TOP" screen. |
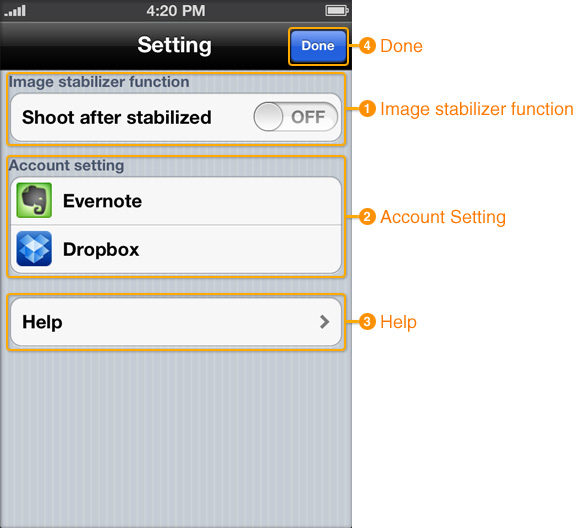
| ① Image stabilizer function | If you turn on this function, the App will take a snapshot of the whiteboard when you hold the device perfectly still. *This function is turned off by default. *A "stability indicator" is displayed in the "Snapshot" screen. |
|---|---|
| ② Account Setting | Setup an account for Evernote and Dropbox to synchronize with the App. If you already have an account, simply enter the User ID and Password. |
| ③ Help | Browse explanations of the main features of the App and "how to take a snapshot of the whiteboard". |
| ④ Done | Complete settings and returns to the "TOP" screen. |


![]()